Notes: Installing an Arbor
This blog post is my notes for an arbor installation that is being conducted at a local community garden in Greenbelt, Maryland. It is intended to help me articulate how to build this arbor for when I need to instruct volunteers for a workday event.
Installation instructions
STEP 1: Rest the arbor on top of some 2 X 4's so that it is leveled out. Use a level to ensure horizontality.
STEP 2: Dig four 3-ft holes right next the 2 x 4 supports.
STEP 3: Insert the four 4 X 4 X 10 posts into the holes and be sure they are properly aligned with the doors (sides) of the arbor and ensure that they are exactly vertical. Use the level to verify this. There should only be 7 feet of the posts exposed (10 ft - 3 ft) as the bottom three feet of them should be below the ground in the holes.
STEP 4: Using a 1/2 inch socket, drill in four 1/2in X 4 in lagbolts into each post in order to to attach the sides (the doors) of the arbor as shown in Figure 1.
STEP 5: Remove the 2 X 4s. The arbor should be secured into the posts with a 2 inch gap from the ground.
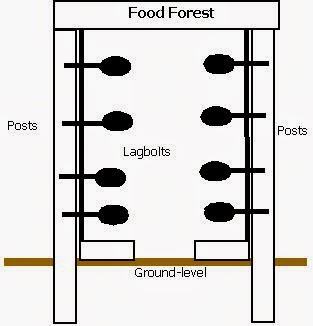 |
| Figure 1: Arbor installation diagram. |
Construction Supplies
- Dewalt drill
- Post hole digger


Comments
Post a Comment